Ten Tips for Terrific Tomato Salsa

I haven’t blogged in ages (over two years – yikes!!), and honestly haven’t been as active as I’d like in the canning kitchen, but one thing that I have never missed any year since discovering canning is making oodles of salsa! Tomato season is in full swing, so I wanted to bring you some of my tops tips for making great salsa every time. Some of these are tips, and some of these are rules for making salsa safely. So let’s dive in!

0909171134a.jpg

10. If you aren’t a big fan of the strong vinegar flavor in salsa, apple cider vinegar has a milder flavor and can be swapped for regular white vinegar in recipes. In fact – use any 5% acidity vinegar you want! Never reduce the amount though, it could make your salsa unsafe.

9. Lime or lemon juice can also be substituted for vinegar, but not vice versa. Vinegar isn’t quite as acidic, but if you prefer the citrus flavor then go ahead and sub!

8. Add dry spices to your salsa if you like a little extra flavor of salt, pepper, cumin, or other dry spices.

7. Select less juicy, more solid textured Roma varieties of tomatoes for a thicker salsa. All varieties, and even tomatillos or green tomatoes are ok to swap in too if you prefer! I always make mine with Romas though for a thick salsa.

6. Pepper varieties can also be swapped out for one another. If you want a spicier salsa, try using a few habaneros! Seed all your peppers if you prefer a milder salsa.

0909171131

5. When blanching tomatoes to peel them, do not over blanch them. Over cooking them will make for a runnier salsa. Blanch tomatoes in boiling water for 30-60 seconds, and then immediately cool them in ice water. I prefer to core them first, then blanch them in batches.

4. Throw your tomatoes in a strainer after you peel them, while they are sitting ready to get chopped. This allows any extra water to drain off to reduce the extra moisture going into your salsa.

0909171224.jpg

3. Make salsa in big batches, but still cook it up in individual batches. I always make a huge batch of salsa in a single day each year. I gather pounds and pounds of ingredients, a few good friends, and a bottle of wine, and get to work. But one thing I learned the first year is that it is best to still mix up a single batch in the pot at a time. This will allow you to make sure that your proportions are correct, all the jars from a batch fit in the canner, and your salsa will heat up a lot faster if you have less volume of salsa.

0909171505b

2. Phone a friend! Canning with at least one or two other people makes the process both enjoyable and a lot quicker. There is a lot of blanching and peeling of tomatoes, chopping of peppers, onions, and tomatoes, and it’s awesome if you can do this an a big assembly line.

0909171440a.jpg

1. Follow a trusted recipe, and don’t f*** with the recipe proportions! This means DO NOT use less acid than a recipe calls for, or use more veggies. The number one important rule or tip for making salsa for canning is safety. Always follow a recipe from an extension service publications like this one or another trusted source like the Ball Complete Book of Home Preserving. If you have a favorite recipe that is lower in acid, and not from a tested source, this is best eaten fresh, or frozen instead. 

0909171623

Now get out there and make some salsa before the season is gone!

The Great Pepper Experiment – Results

IMG_5567 copy

Last summer I grew pepper plants in pots instead of in the main garden. Of course, being who I am, I couldn’t just grow pepper plants, I had to turn it into an experiment. I had space for 6 pots along my fence and I had 12 pepper plants that I had started from seed. Plant 2 per pot you say? Nah, that’s too easy. I decided to instead do two pots with one plant each (a bell pepper and a jalapeno pepper), two pots with two peppers, and two pots with three peppers. All summer when I picked a pepper I kept a record of what plant it came from, and this is what I saw.

pepper graph

As you can see, it’s sort of what you would expect. I had the most peppers from the plants that were by themselves in a pot, and when more plants we together I got less and less pepper production. You can also see that it wasn’t a very well replicated or scientifically sound experiment, and I had more jalapeno plants than bell peppers, but I still found it interesting. The jalapeno all by itself produced almost 100 peppers, whereas the ones sharing produced almost half that! So it’s probably worthwhile to plant them alone and let them thrive. The bell pepper plants produced less, but still not 50% less so maybe it’s OK to plant two in a pot? Qualitatively though I could tell they weren’t happy with three in a pot. Some of the peppers had brown rotting spots on them, and they did not get as big. All in all it was a delicious experiment, and this year I’ve got some in the main garden, and some in pots.

Now get out there and plant some peppers!
Have you ever grown peppers in pots? How did they do?

Botany Barn – Where has the Babbling Botanist Been!?

logo with bb-01

Hey Babbling Botanist readers! It’s been a really quiet winter from me on the blog, and I am excited to let you in on one of the reasons why. This winter I spent a good chunk of time on my other hobby (OK one of my other hobbies, it seems I have a lot these days), and turned it into a bit of a side business. I’ve been busy soap making this winter and I’ve opened a store on Etsy called Botany Barn, where I am selling handmade goodies like soaps, lip balms, and other handmade cosmetics that I will gradually be adding to my product lines. In line with my love of homegrown organic foods and preservation, I make Botany Barn products with almost entirely organic ingredients, natural colorants and scents, and make products that are not only good for you, but good for the planet. It has been so much fun getting this going, and I wanted to let you all in on it and also give a shout out to my Uncle Scott who named the store, and my friend Laura who made the awesome logo! Who knows if Botany Barn will take off, but it certainly kept me sane during the ecology and preservation off-season. 🙂 I hope to get back into blogging this summer though (between running Botany Barn and working as a Field Ecologist!) But anyways, if you are interested in where I’ve been this winter, check out botanybarn.com!

Here are some of the things I currently have available:

Three pack of small soaps. I really enjoyed taking adorable photos!

3 small 1

The five different soaps I’m starting off with. From left to right: Butter Me Up!, Lavender, Peppermint, Nude, and Let’s Face It!

3 small 3

Butter Me Up!

3 small 4

Charcoal facial soap

Face 1

Lavender

Lavender 3

Peppermint

mint 1

Nude

Nude 2

Five lip balm flavours!

lip balms

Thanks for sticking around during my absence, and you’ll hear from me again soon!

Book Review – The Hands-On Home

Today’s post is a review of a great book on keeping a natural, healthy home. I’ve already bought 3 copies of it – for myself, my mom, and my sister, and wanted to give you a peak into the book!

IMG_5918

The Hands-On Home is written by Erica Strauss, the author of my favourite blog – NW Edible Life. If you love food preservation, growing food, or eating food and are not reading this blog, you are missing out. Erica writes about all sorts of gardening, food preservation, and urban homesteading topics, and is always my go-to resource for when to plant my garden (she’s just north of me in Seattle), and she’s always good for a fun cocktail recipe too. I love the blog because her posts are not only educational, but she injects humour, and I feel like we would get along if I knew her in “real life.” Her book is extra special to me because I heard about it long before it came out, and tested some of her recipes in the early stages of book writing. I actually managed to get my name in the acknowledgements for the tiny bit of work I did! Fun! So I may be a bit biased in my love for this book, but here is my take, and a little bit more about what I like about the book.

IMG_5945

The Hands-On Home is organized by season, and by topics within each season. Within a season it features seasonal recipes for cooking, preservation, home care, and personal care. It also features some great year-round information like recipes that are great for all seasons, cleaning techniques and recipes for natural cleaners, food preparation and preservation techniques.  I like the seasonal organization of the book, because I can flip to winter, and make a dish that features ingredients that are actually in season in the winter, or get an idea of a food preservation idea for the winter. The personal care products are nicely organized by season as well, like a summer after-sun gel, or a winter lip balm, although many are also great across seasons.

IMG_5921

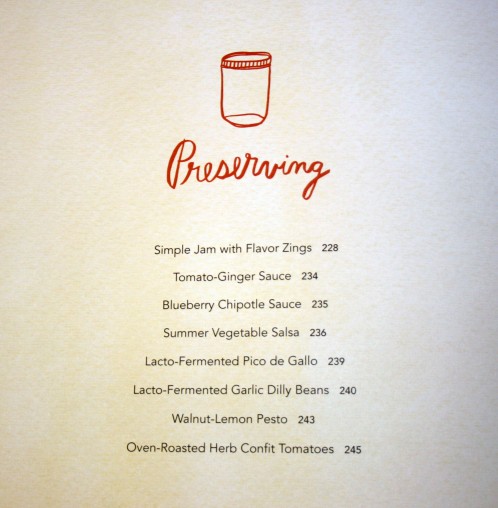
The contents for the summer preserving section.

IMG_5931

The Hands-On Home is also very well illustrated. The pictures are gorgeous and will leave you wanting to make every recipe in the book. So far all the recipes I’ve made have been delicious! From a Kamut salad with delicata squash and dried cherries, to homemade granola, or oven-roasted herb confit tomatoes, this book has recipes for everyone.

IMG_5938

One of the recipes I actually tested in the early stages that ended up in the book was this delicious shrimp dish with a fresh basil, corn, black beans, and avocado salad. So good!

IMG_5940

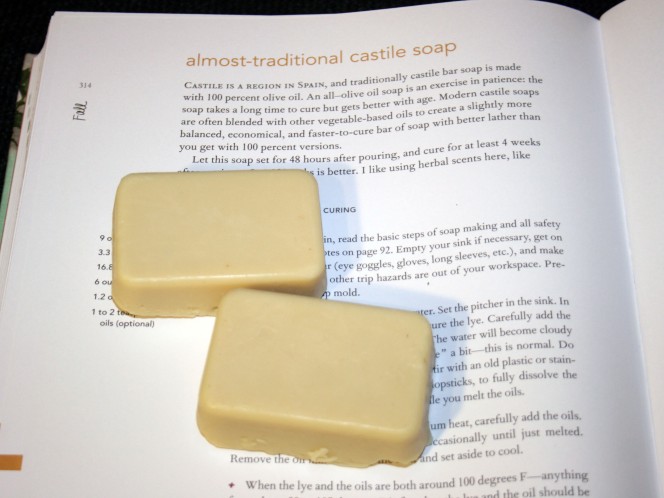
I’ve also been really into homemade personal care products lately, and I’ve enjoyed making many of the home and personal care recipes. So far I’ve made Erica’s lip balm, bath bombs, bath salts, laundry detergent, and bar soap. See my bars below! I’ve actually been making a lot of soap recently, and this was one of the favourites when my family tested my bars.

IMG_5932

So if you are looking for a great book with everything from DIY hair-styling wax to recipes for preserved mustard or lacto-fermented pico de gallo, you’ll love this book. I can’t wait until canning season rolls back around to try some more of the canning recipes!

*this post contains affiliate links, please see the “About the Blogger” page for more information

Ball FreshTech Canner – Not Just for Canning Anymore

IMG_2902

When Ball put out their FreshTech electric water bath canner this year, which I previously reviewed here, they also advertised it with some additional uses, beyond just using it as a canner. I thought I would probably just use it for canning, and those other uses were just a good marketing idea, but I’ve actually come to use it for quite a few other things so thought I’d share some of them with you in case you’ve been on the fence about buying one. Ball’s suggestions mostly revolve around making a big batch of something – which makes sense, a lot of us don’t have another pot this big, so it is good for a big batch of whatever you are making. It also comes with a steaming rack for steaming vegetables, but to me unless you are steaming a whole lot, using this giant pot maybe isn’t ideal. My ideas for it mostly revolve around the fact that it’s very easy to get the canner to stay at a set temperature. Unfortunately the dial doesn’t have temperatures on it, so if you want to know the exact temp you need a thermometer (this is the one I use most often), but it does maintain pretty much whatever temperature you are interested in. So here are some of my uses for it!

ball-canner-dial1

BEER!

Now if you are a pro, making all grain beer and being all fancy like, you probably won’t agree with this one, but I think the canner is awesome for making beer. Why? Well if you are making beer from malt extracts and a smaller amount of specialty grains, usually what you do is first steep some grains at around 170 F, then add the extract and bring your wort to a boil. Using my electric stove top, I often find myself overshooting the steeping temperatures, but using the canner has been much easier. Why? Because of the way the canner burner pulses on and off to maintain the temperature. Additionally, I just left the canning rack in the canner, and set my grain bag full of grain on top of it so I didn’t have to worry about it touching the bottom and melting or burning. Once you get your wort to your steeping temperature, turn the heat down until you hear the burner turn off, then it will just come back on in short bursts necessary to maintain that temperature. Worked like a charm. Then you have two options when you are done steeping. Either boil the wort also in the canning pot, or if you want to use your larger brew pot simply put it under the spout of the canner, open the spout and sparge your grains. Either way works great! And many of the “mini-mash” recipes that I have followed actually only tell you to boil about 3 gallons of the wort and top it off at the end anyways, so this is a great option for those recipes and for beginners not ready to invest in more equipment. Last time we brewed, we actually made one batch in the brew pot we have, and one in the canner because there is very little active time involved it was great – two brews in the same amount of time as one!
IMG_3062

Mmmm wort.

IMG_3206

 Making Stock

After thanksgiving I froze the turkey carcass to make stock with, and decided to do it with the canner this year. I am quite happy with how it turned out! I was a little concerned with whether anything would burn to the bottom (which it didn’t at all) so to be safe I actually left the rack in the canner, filled it with my bones and bits of meat, carrots, onions, celery and spices, and covered with water. Similarly to the way I’ve made stock in the crock pot before, I actually didn’t boil a ton of the water off, but rather let it just cook on a hot but not boiling temperature. I made sure that there was a ton of water in there so there was no chance of it cooking all off, and left it cooking for a full 24 hours. Turned out super well!

IMG_3234

Pasteurizing milk

Another possible use for the canner is pasteurizing milk. Weck actually markets their canner as a “pasteurizer.” If you have access to raw milk, and want to pasteurize it at home, you could do a nice big batch in the canner. Again, the pro here of the canner is the same as many of the other uses – I find it much easier not to overshoot the temperature. Use your canner as a double boiler with your largest pot. For pasteurization,  you want to either heat to 145 F for 30 minutes (reference here) or to 165 F for 15 seconds (reference here). The canner is large enough that you could easily use it as a double boiler for most sizes of large pot. Pictured is my 4.5 quart pot, but my larger stock pot is the same diameter and fits nicely also if I wanted to do a larger batch.

IMG_3156

Mulled Wine (and other hot beverages)

This one was inspired by Ball’s suggestion of apple cider, but the canner can be used for mulled wine too. The thing I like again is that you can just leave it on low and it will keep the wine warm, and you don’t have to worry about having a burner on. Plus it has a spout for serving!

FullSizeRender

Do you have the new Ball canner? What creative ways have you used it? Interested in purchasing one? – They have had a couple sales on amazon so keep your eyes peeled for after Christmas sales, or buy one for the canning junky in your life!

*this post contains affiliate links, please see the “About the Blogger” page for more information (Yes, if you buy the canner from amazon I will receive a small profit, but I would never recommend a product I don’t love just because of that!!)


End of Season Freezer Tour

We officially had the first frost of the season, which means the bulk of the preservation season is over. I do still have some carrots, beets, and broccoli alive in the garden, but the tomatoes and peppers are toast. Sad, but luckily now we enter the phase of eating all these goodies which is also great! Being so busy this summer, I didn’t do nearly as much canning as last summer, but one thing that helped some with my time crunch was having a freezer this year. A chest freezer is really a great investment if you have the space, and I have not even noticed a change in the power bill. At this time of year it’s a great idea to go through your freezer, sort it, and determine what you have so that you ensure you actually eat those things throughout the winter. I just went through mine, so thought I’d give you a tour of it!

On the bottom here you can see that I had a very successful berry season. I tried to layer the bottom of the freezer with the berries, since I have so many, then have one of each bag more accessible, and I can grab another as needed.

IMG_5900

On top of the berries I have some vegetables and meat that I froze this summer. Home grown broccoli vacuum sealed using my new food saver, corn from the local farm stand that I got when they were having an awesome sale, tomatoes from near the end of the season when they were growing slowly so I accumulate them until I have enough for some sauce, and some meats that I bought either on sale or in bulk from Costco.

IMG_5903

On the next layer we have in that bag a turkey carcass which I plan to take out when I have more time and make stock with, we also have some corn dogs (mostly the boy – but everyone can’t be perfect in what they have in the freezer right?) and in the basket some bread and the last bit of smoked salmon from this summer.

IMG_5907

All in all I think I did pretty well on berries (more than enough probably!) but would have liked to freeze a little more in the way of veggies. I do have winter squash that I still plan to cook, puree and add to my freezer stash, and once that carcass is out I’ll have a little more room for that, but overall I think the season was a success – the freezer is nearly full after all. I did also eat some of the things I preserved earlier this season – as it should be! Now go check out you freezer, and don’t let that stuff in the bottom sit there for the rest of eternity – eat it!

What things do you like to preserve by freezing? How was your preservation season this year?

Adventures in Smoking Salmon (Safely)

IMG_3144

During the time I spent in Alaska I was able to enjoy a lot of salmon, especially smoked salmon, but it wasn’t until becoming a Master Food Preserver that I attempted to make smoked salmon myself. It’s not terribly hard, but you do of course need a smoker, some wood chips, and some patience. To make sure it’s done safely, a good thermometer, and preferably one you can leave inside the fish like this one, is also important. Now if you love smoked salmon as much as us, you know how expensive it is to buy, so gather up some gear and try it yourself. Also check out the publication on this topic PNW 238 Smoking Fish at Home – Safely and if you want to can your fish, check out Canning Smoked Fish at Home for how to safely can home smoked fish.

Here’s how it’s done. First, brine your fish in a salt water brine. If you want a sweet or spicy brine, you can certainly also add some brown sugar, spices, or whatever at this point, but salt is the key ingredient to help get the fish to dry out. The extension publication recommends a brine of 7 parts water, to one part salt to ensure enough salt in the final product. Place your fish in a single layer in a shallow pan, mix the salt and water (and whatever else you want to add) in a separate bowl, and pour it over your fish to completely submerge it in brine.

IMG_5674 copy

Large pieces of fatty fish require the longest brine; smaller, leaner fish require less brine time. I brined the salmon (in the fridge) for close to two hours, as they were fairly large fillets. After the brine time completes, rinse the fish lightly, and leave it out to dry. You want a pellicle to form on the fish, which is basically a tacky clear film on the surface, because this will absorb in the smoke flavour much better than if we began smoking right away. It also helps to prevent spoilage. Placing the fish in front of a fan can speed up the process, but you’ll want to leave it for about an hour.

When you are getting a good pellicle, start up your smoker. We used a Smoke Hollow smoker like this one but others function similarly. Follow the manufacturers instructions, but basically there is usually one tray that you fill with water and another that you fill with wood chips. Use hard woods for smoking, as soft woods will leave an undesirable flavour on the fish. Fill these and start the smoker on a low temperature to start getting some smoke going.

IMG_5681 copy

Place the racks full of fish into the smoker and close the door. Keep the heat around 90 F, bascially you want it hot enough that it is producing smoke, but not so hot that you are just cooking the fish. We want to first smoke it, then cook it. Smoke the fish for up to 2 hours at these low temperatures, and then increase the temperature of the smoker to between 200 – 225 F. To ensure your fish is safely cooked, we want to reach an internal temperature of 150-160 F and hold it there for 30 minutes. Now is the time you want your thermometer in the thickest piece of fish, on the top shelf where it’s coolest, and make sure you hit that temp. It’s nice to have one with a cord or long stem so you can feed it through the vent hole in the smoker and not have to open the door to continually check the temp. If you have a thermometer that alarms when you hit your set temperature, then even better! Hit that temp and maintain for 30 minutes.

lIMG_5684 copy

Now your salmon is done! Take it out and give it a taste. Deeeeelish! Refrigerate the fish for up to two weeks, or freeze for long term storage.

IMG_5690 copy

To maintain the best quality product, vacuum seal your delcious bounty using a product like a Food Saver. I finally invested in one this year when Costco was having a sale since I now have a good sized freezer, and it’s really helping me maintain my food quality! mmm. Now this has made me hungry, off to make some salmon dip.

IMG_5694 copy

*this post contains affiliate links, please see the “About the Blogger” page for more information

Freezing Vegetables

This spring I bought myself a great present – a freezer. Thanks self!! Therefore, I have been doing a lot of freezing preservation this summer in addition to my usual canning. I must say I am love love loving it! Freezing is very easy, and some things of course do much better being frozen. Can you imagine canned broccoli? Ick, that would be gross. Anyways, there is basically just one very simple step needed to prepare vegetables for freezing. Most vegetables need to be blanched before freezing to stop the action of enzymes that will cause the quality of food to degrade. Blanching helps preserve texture, nutrition, and flavour of vegetables. One of our lovely master food preservers tested the utility of blanching by doing a batch of broccoli both with and without blanching and it really matters! Without blanching the broccoli had a much stronger, less desirable flavour. So don’t skip it! Here’s how:

IMG_5697 copy

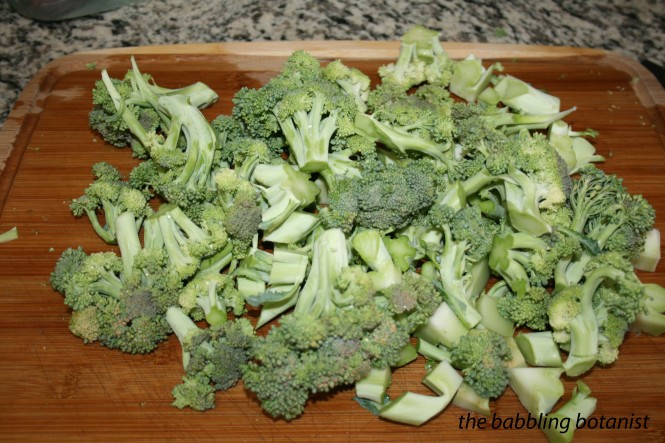
Step one is to harvest high quality veggies and process them as soon as possible. This year I actually had a successful broccoli crop – wooo! But by myself I am certainly not going to eat 5 heads at a time, so I froze a bunch.

Wash and trim your vegetables as you would plan to use them when you eat them.

IMG_5699 copy

Blanch vegetables in boiling water or in steam. PNW 214 is a great resource for looking up how long different vegetables need to be blanched. For broccoli it is three minutes in boiling water or five minutes in steam. I love my blanching pot for this. Bring the water to a boil, add veggies, and start the time when the water returns to a boil.

IMG_5704 copy

Cool vegetables under cold water for about the same amount of time as you blanched them.

IMG_5705 copy

Dry and freeze! That’s all there is to it. With many things it works best to first spread things out on a baking sheet and freeze them, then package them once they are frozen. For best quality, package things in airtight containers. Air causes freezer burn and food quality to degrade more rapidly. I just got a FoodSaver to go along with my freezer (and by that I mean it went on sale at Costco so I impulse bought it) and something like this really helps maintain quality. If you don’t have one just try and remove as much air from bags as you can. I admit that I’ve sucked air out of berry bags with my mouth… silly but actually fairly effective. Don’t say I never suggested more economical methods 😉

IMG_5787 copy

Have other questions about freezing? Ask me or check out the National Center’s FAQs here.

*this post contains affiliate links, please see the “About the Blogger” page for more information


Coconut, carrot, date, and sesame seed “cookies” – Go Raw clone recipe

My go to field snack is always granola bars, so last summer I was trying to mix things up and I discovered these delicious Go Raw cookies. They are tasty tasty! And pretty good for you – sprouted sesame seeds, carrots, coconut, dates and no added sugar. However, they are absurdly expensive, so I decided to try and make them myself. I finally got around to it last week when I harvested a bunch of carrots. They only have 5 ingredients, so I figured I could clone the recipe pretty easily. Here is what I came up with!

IMG_5862 copy

Ingredients:
1/2 cup finely shredded carrots
1/2 cup shredded coconut
1/2 cup sesame seeds
1/2 cup chopped dates
1/2 tsp nutmeg

This recipe will fill approximately one dehydrator tray (quite fully), so multiply accordingly. I tried a few different ratios of the ingredients, and this one to one ratio was the one I liked best. I think it might be more dates than the Go Raw recipe, but it’s really tasty, and 1:1:1:1 is easy peasy to remember, to double, etc.

First I shredded the carrots through my food processor, then pulsed them to chop them up even more. For the dates, I pitted them and pulsed them in the food processor as well.

IMG_5829 copy

Measure equal parts of the 4 ingredients and combine in a food processor. Add a bit of nutmeg, 1/4-1/2 tsp or to taste. If you don’t have a food processor do small batches in a blender, or mix it up by hand in a large bowl.

IMG_5831 copy

Nom nom nom. Pretty and tasty!

IMG_5832 copy

For drying you have two options. For option one I spread the mixture out evenly across a fruit leather tray on the dehydrator, then just broke it into pieces once dry.

IMG_5834 copy

Alternatively you can form them into cookies. Mine were pretty large, much larger than the Go Raw cookies I was trying to clone, but you could make them any size. Smaller would of course dry faster. I was thinking that you could also roll this out almost like dough and use cookie cutters or cut it into squares with a knife. I think I’ll try that next time.

IMG_5838 copy

Mine in back, Go Raw in front!

IMG_5856 copy

I dried them for about 16 hours and they still weren’t quite crispy, but  they were a somewhat soft consistency that I liked. I think they might have been a little wetter too because I had more dates than the Go raw recipe. Dry until your desired consistency.

IMG_5859

Enjoy!

Tools I used for these:
My food processor
NESCO dehydrator
Fruit leather sheets

*this post contains affiliate links, please see the “About the Blogger” page for more information

Plum Sauce

mmmm plums. Last year I posted another plum sauce recipe, which was also delicious, but keeping with my desire to make every recipe from the Ball Complete Book of Home Preserving, I decided to try their recipe this year. The only thing I changed from what’s in Ball is to add allspice, and remove some of the sugar. Make it with a mix of plum varieties for extra fun sauce!

IMG_5618 copy

10 cups chopped pitted plums
3/4 cups finely chopped onion
2 tbsp chopped seeded chili pepper
1 cup cider vinegar
2 cups brown sugar
1 cup white sugar (optional in my opinion)
2 tbsp mustard seeds (I used 1 ish tbsp ground)
1 tbsp salt
2 cloves finely chopped garlic
1 tbsp finely chopped gingerroot
1/2 tsp allspice

To make it:

Dice the plums, pepper, onions, ginger, and garlic finely and combine everything except the plums in a large pot and bring to a boil. I thought 3 total cups of sugar sounded like too much, so left out the white sugar and decided I’d taste it and add in later if I wanted it sweeter. I didn’t end up adding in though, it’s plenty tasty without, so consider reducing it if you want a less sweet sauce; Ball tends to make things quite sweet.

IMG_5627 copy

Add the diced plums and return to a boil. Reduce heat and continue to simmer for a few hours, until it reaches a good plum sauce consistency. When you are getting close, prepare 4 pint jars, or 8 half pints.

IMG_5633 copy

Here it is reduced by about half, a few hours later.

IMG_5638 copy

Fill hot jars, leaving a half inch head space. Wipe rims, apply lids, and tighten finger tip tight. Process in a boiling water bath canner, covered by at least 1-2 inches of water, for 20 minutes. After 20 minutes, turn off heat, remove canner lid, wait 5 minutes, and remove jars to a hot pad or towel. Cool, check seals, label, and store.

IMG_5644 copy

Gorgeous!! And tasty.

IMG_5656

*this post contains affiliate links, please see the “About the Blogger” page for more information