Book Review – The Hands-On Home

Today’s post is a review of a great book on keeping a natural, healthy home. I’ve already bought 3 copies of it – for myself, my mom, and my sister, and wanted to give you a peak into the book!

IMG_5918

The Hands-On Home is written by Erica Strauss, the author of my favourite blog – NW Edible Life. If you love food preservation, growing food, or eating food and are not reading this blog, you are missing out. Erica writes about all sorts of gardening, food preservation, and urban homesteading topics, and is always my go-to resource for when to plant my garden (she’s just north of me in Seattle), and she’s always good for a fun cocktail recipe too. I love the blog because her posts are not only educational, but she injects humour, and I feel like we would get along if I knew her in “real life.” Her book is extra special to me because I heard about it long before it came out, and tested some of her recipes in the early stages of book writing. I actually managed to get my name in the acknowledgements for the tiny bit of work I did! Fun! So I may be a bit biased in my love for this book, but here is my take, and a little bit more about what I like about the book.

IMG_5945

The Hands-On Home is organized by season, and by topics within each season. Within a season it features seasonal recipes for cooking, preservation, home care, and personal care. It also features some great year-round information like recipes that are great for all seasons, cleaning techniques and recipes for natural cleaners, food preparation and preservation techniques.  I like the seasonal organization of the book, because I can flip to winter, and make a dish that features ingredients that are actually in season in the winter, or get an idea of a food preservation idea for the winter. The personal care products are nicely organized by season as well, like a summer after-sun gel, or a winter lip balm, although many are also great across seasons.

IMG_5921

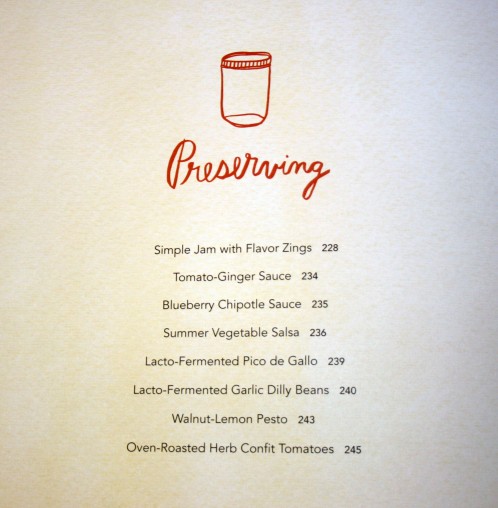
The contents for the summer preserving section.

IMG_5931

The Hands-On Home is also very well illustrated. The pictures are gorgeous and will leave you wanting to make every recipe in the book. So far all the recipes I’ve made have been delicious! From a Kamut salad with delicata squash and dried cherries, to homemade granola, or oven-roasted herb confit tomatoes, this book has recipes for everyone.

IMG_5938

One of the recipes I actually tested in the early stages that ended up in the book was this delicious shrimp dish with a fresh basil, corn, black beans, and avocado salad. So good!

IMG_5940

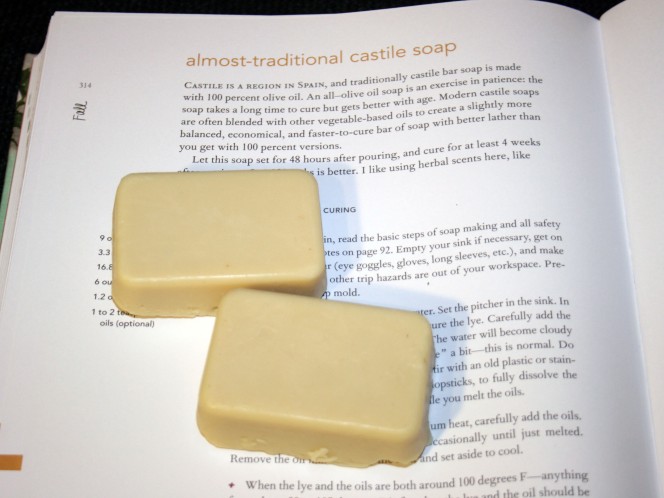
I’ve also been really into homemade personal care products lately, and I’ve enjoyed making many of the home and personal care recipes. So far I’ve made Erica’s lip balm, bath bombs, bath salts, laundry detergent, and bar soap. See my bars below! I’ve actually been making a lot of soap recently, and this was one of the favourites when my family tested my bars.

IMG_5932

So if you are looking for a great book with everything from DIY hair-styling wax to recipes for preserved mustard or lacto-fermented pico de gallo, you’ll love this book. I can’t wait until canning season rolls back around to try some more of the canning recipes!

*this post contains affiliate links, please see the “About the Blogger” page for more information

Master Food Preserver Manual

I recently added a “resources” tab to my blog, to which I have been adding some of my favourite extension service publications, and products I love. In preparation for the upcoming preservation season, I had been thinking to myself, “how could I make this as useful and accessible to people as possible?” What I came up with was to provide you with all of the resources that are available in my Master Food Preserver notebook. When I started the MFP program last year, I got the notebook pictured below, which has a ton of different extension service publications complied into one handy (albeit giant) binder. So I wanted to make that virtually available to you in a well organized fashion, until I found out it is already available online! So exciting!! So if you are looking for basically all the publications that you need to safely prepare and preserve food safely at home click here. It’s all available free online on the OSU extension website – who knew! This is an amazing and FREE resource, check it out! The key was that it’s under faculty resources. All these publications are available online, but this is the first time I’ve seen them all organized together. Of course the tips for volunteers section isn’t important for you, but the rest of the chapters are nicely laid out and accessible. Enjoy, and happy preserving! 

20140429-211826.jpg

Do you refer to extension service publications? What’s your go-to source for recipes and instructions?

Year End Canning Reflection

When in the world did it get to be mid December?! I can’t believe. At this time of year, most of us have entered our “net loss” phase from the pantry – i.e. we are now eating more than we are putting up. Because of this, I think it’s an appropriate time to reflect on the things we have preserved this year, and on things we were wishing we had taken better advantage of while they were in season, so we can prepare for next year. Here’s a look at my canning list – just over 600 jars, not including the things I did in MFP class. This may partially explain why I haven’t yet defended my masters… Anyways, before judging me on this crazy list, keep in mind that I often can with a friend, so for many of these large batches I only kept half. I also canned jams for two different weddings, so only about 10% of this jam is actually in my house currently.

Jams and Jelly – 214 jars (ya…I know)

IMG_2031 copy

22 rhubarb orange jam
8 strawberry rhubarb jam
8 strawberry lemon marmalade
46 strawberry jam
5 kiwi daiquiri jam
6 cherry marmalade
36 raspberry jam
26 blueberry lime jam
15 orange marmalade
12 zesty watermelon jelly
12 watermelon jelly
6 habanero jelly
6 inferno wine jelly
6 blueberry butter

Summary  – I definitely went crazy, but actually compared to last year it’s not that bad. I did 95 last year and sure I gifted some of them, but this year a massive percent were wedding favours.

Other fruit things – 46 jars

IMG_4054 copy

4 jars cherry pie filling
8 pints strawberry lemonade concentrate
4 pints rhubarb juice concentrate
5 pints cranberry juice
12 half pint Asian plum sauce
9 pints Victorian barbecue sauce
4 half pints cranberry mustard

I am pretty happy with these items, and I certainly think I will eat it all. I do moderately regret not doing a couple other pie fillings as having those is super super nice for when a potluck catches you by surprise. Otherwise yay fruits!

Pickling – 77 jars

IMG_4009 copy

3 quarts refrigerator pickles
20+? jars dill pickles
19 jars pickled carrots
8 pints zesty zucchini relish
9 pints pickled asparagus
14 pints dilly beans
4 quarts sauerkraut

Other than forgetting to pickle beets, my pickling was pretty good this year. And with discovering low temperature pasteurization my pickles are better than ever. Somehow I totally lost track of my cucumber pickle numbers though. My list said 12 – but I am sure I made at least 3 times that considering my pickling experiment alone was 9…but anyways.

Tomatoes – 189 jars

IMG_4304 copy

8 quarts crushed tomatoes
35 pints tomato sauce
115 pints salsa
14 pints two in one barbecue sauce
9 pints ketchup
8 jars tomato “jam”

Yes…115 jars of salsa. I know, I know… I think about 65 went to me. This number makes me very very happy. Last year I had about 40, and I had a couple left when tomato season hit, so we should be golden. I was super stingy with gifting these so this year my family may get a jar or two… maybe. 😉 The only thing I kind of would have liked more of is just plain crushed tomatoes. They have so many versatile uses!

Pressure canning – 82 jars

IMG_2646 copy

22 half pints corn
38 half pints tuna
16 jars spicy tomato vegetable soup
6 pints chicken stock

I am pretty happy with my pressure canning additions to my pantry, and actually a little surprised I didn’t do more. But this winter I plan to do some more stock, dried beans, and other things not necessarily season dependent. Winter is a good time to stock up on chicken, beef or ham stock. Ya, very bad pun intended.

Of course this is just canning, I also froze and dehydrated a lot of things. All the berries I froze are already eaten sadly, I need a bigger freezer, but not the freezer jam and dehydrated goods.

How was your 2014 season? Anything you missed out on that you definitely are planning on for next year?

To conclude, I’d like to introduce a new series of posts I’m starting this winter entitled “Eat it!”, which will feature recipe ideas for using all the delicious things we preserve. Like many other preservation bloggers, I have a little less to talk about during the off season, and I think that talking about ways to use the things we preserve is just as important as how to preserve it. There is no point in putting up 500 jars of goodies if you ain’t gonna eat it! I hope to get creative with these and help you use up some of those items lingering in your pantry, and give you some ideas for things you might want to preserve next season.

Small Batch Homemade Fruit Wines

Making homemade fruit wine is such a satisfying experience – watching your fruit transform into something completely new and delicious. The length of this post may make it seem like a difficult process, but it’s really not that hard to make a small, gallon batch. So pour yourself a glass of wine, settle in, and read on. For the printer friendly version, click here.

IMG_3768 copy

Last winter we decided to try our hand at home brewing. We started with beer, and you can read our first brews adventure here. Then we tried some kit wines which you can read about in this post. The next stage of the adventure was to try some small batches of fruit wines, which we started this spring. They are actually surprisingly delicious! And I say surprising because I normally am not a lover of fruit wines because I find them too sweet. However, these “first wine” recipes, copied with permission from Joel, the owner of our local brew store, Corvallis Brewing Supply, are designed to be dry wines and they are really tasty.

IMG_4660

Before I get into the details of how to get brewing, I just wanted to quickly (ish) list and describe the ingredients that you will be adding to your wine and why. These can all be purchased at your local brew store (if you have one) or by clicking on the links attached to them. Skip ahead if you just want the hows and not the whys.

Fruit! – OK this one is obvious, but the one thing I wanted to point out is that you can use fresh or frozen fruit for this. Use only the best quality fruit. Nasty fruit will make nasty wine.
Yeast – These little guys are what is going to turn the sugars in your fruit into alcohol. There are a large number of yeasts available on the market, but you don’t just want to use bread yeast for making wine. They are cheap, so buy a packet of the kind called for in your recipe. A few common ones for wine are Montrachet, K1V-1116, Cote de Blancs or Lalvin D-47.
Dextrose – Dextrose is fermentable sugar that is added to feed the yeast and produce alcohol. Some fruits don’t have as much sugar content as others, so extra sugar is added to balance the sugar and acidity and produce a good product. Grapes, for example, require a lot less added sugar than cane berries, such as raspberries and blackberries. This is due to the properties of the berries themselves. Table sugar, which is sucrose, can be used instead of dextrose, but it can produce a different quality product. Dextrose is a simpler sugar that can be broken down faster by the yeast, which can lead faster fermentation and to a crisper and cleaner tasting end product. I haven’t personally done a side by side comparison yet, but when I do I will let you know what people preferred. I’ve only so far tasted wines using dextrose. When using table sugar in a recipe that calls for dextrose, use 0.8 pounds for every pound of dextrose that is required.
Pectic Enzyme – This is added to your fruit wines because it will help break the fruits down and make the sugars available to the yeast to ferment. Pectin is a compound found in plants cell walls, and what this enzyme does it help to digest that for the yeast, making more sugars available. You could certainly still make wine without it, but it aids in the process. It also can help produce a clearer product by digesting the pectins.
Yeast Nutrient – This is added to give some other nutrients to your yeast so that they aren’t surviving on sugar alone. It contains vitamins and minerals, think of it as giving your yeast a multivitamin. I like the way Joel put it – think about how you would feel if all you ate was sugar. This is why you add some nutrient.
Diammonium Phosphate – This is another thing that is just a helpful nutrient to give your yeast. It’s a nitrogen source which helps the yeast along. If you are getting a rotten egg type smell from your wine, it could be because you should have added some D.A.P. Some recipes do not call for it, and I think it’s one of those things that’s not always necessary, but it only takes a very small amount so I figure why not use it. Also, as a side note, some of the things labelled “yeast nutrient” on amazon and elsewhere have this in them already, so check the ingredients to see what you’ve got.
Campden Tablets – These tablets are made of Potassium Metabisulfite, and they serve a couple really important purposes. They are not something you want to be leaving out of your recipe. Sulphites in your wine prevent a few things – the growth of bacteria and wild yeasts and oxidation of your wine. All things that you really don’t want to have happen. But as a sad side note, the suphites in wine are often the thing that give people that red wine headache. Fortunately I don’t have that issue.
Acid blend – This is a combination of three acids – citric, tartaric and malic, which come from citrus, grapes and apples. They are used to lower the pH of the wine and give the wine balance.

DONE! I know that was a lot of ingredient listing, so I’m sorry if that bored you, but I for one don’t like blindly throwing things into a recipe not knowing what they are for, so I wanted to lay out for you why we need a tiny amount of a bunch of different things. So there we go. Now on to the making of the wine. In the table below are 8 options for good first recipes to try. Already have one of these fruits in the freezer? Awesome! What are you waiting for!?!

Each of the recipes below makes a gallon of wine. They all have the same ingredients, just in slightly different proportions based on how acidic the fruit is, and based on its relative sugar content. The method will be the same for whichever recipe you try. And as a side note, before you begin I highly recommend keeping a brewing journal of dates and ingredients etc. Especially when you are brewing multiple things at a time. I must confess that I am currently not 100% sure which jug is blueberry wine and which is blackberry.

wine table

Home made wine is really not a lot of work, you actually only have a few active days when you are doing something to the wine, and the rest is a waiting game. Considering that the cheapest fruit wines I really ever see are $25 and you can make a pretty good wine at home for far less than that, I think it’s well worth it. So here is how it’s made:

Day 1:

On the first day what you’ll be doing is preparing the fruit and mixing all the ingredients together except for the yeast. Remember, when picking fruit only use the best quality fruit. Crappy fruit will make crappy wine. Also use nice ripe fruit, but not overripe. Think about when you taste a berry that’s not quite ripe. It is less sweet because it does not have as many sugars as when it is fully ripe, so a fully ripe berry will make a better wine.

Step 1: Clean and sanitize your equipment. All you’ll really need day 1 is the primary fermenter and maybe a masher or spoon to stir with. For the dos and don’ts of what to use as a fermenter, head here. I made mine, and the reason for that was because I planned to do a bunch of small one gallon batches, and we own only a huge 8.5 gallon primary fermenter for beer, so it made sense to have a little one too. Anyways, that can be sanitized either by dissolving a campden tablet in a gallon of water and letting it sit for a few minutes, or I like this sanitizer. While the equipment is drying, prepare the fruit.

Step 2: Give your fruit a good wash, check for any bad spots and remove them, and remove any stems and pits. Things like strawberries, blueberries and raspberries basically just need a good wash. For the peaches I would blanch and peel them first. Chop and remove the pits and place them in your primary fermenter.

IMG_4221 copy

I like to then give the fruit a light mash to release the juices.

IMG_4225 copy

Step 3: The next thing you’ll do combine all the ingredients except for the yeast. I top it off with water to just above 1 gallon in my 1.5 gallon fermenter (4.5-5 quarts), but go ahead and top the water up to 1.25 gallons if you’re using a larger fermenter. Give it a stir to dissolve the powders and cover it. Leave it for 24 hours. This gives the campden tablets time to kill yeasts and bacteria already in there, and the pectic enzyme to start breaking down the fruit for the yeast you’ll add the next day. Don’t wait longer than 24 hours though, or you may have your ingredients spoil. You need to get the fermentation going or other things will colonize your fruit. And that is just plain nasty. And sad.

IMG_3800 copy

Day 2: 

On day 2, you will open up your primary fermenter and pitch the yeast. Half of those 5 g packets is enough, so if you are planning on making another wine with the same yeast in the near future save the other half in the fridge. All you need to do is sprinkle the yeast on and close the lid back up. Make sure you have an airlock on your fermenter, and fill it will sanitizer or alcohol.

IMG_3805

Now we wait for a few days. Within 12-24 hours you will notice bubbles coming from the airlock as fermentation begins. You can probably hear the yeast working too.

Day 2 or 3:

About 12 hours after you add your yeast, you want to give it a little stir. Sanitize a spoon and stir the must (that’s what wine that’s not wine yet is called).

IMG_3950 copy

Days 2-5:

While your wine is fermenting, you will notice that the fruit is constantly floating to the top. To make sure that all the fruit gets fermented, and you don’t get massive air bubbles building up underneath the fruit, you need to break that mass up a couple times a day. This is called “punching the cap.” This is my favourite stage in the process, not only because of its silly name, but also because every day you get to open the lid and smell the fermentation in progress. Using a sanitized spoon or masher, gently punch the cap, then place the lid back on. This is also a great time to make sure you don’t have any weird or nasty smells. It should smell strongly alcoholic but not like acetone, or rotting eggs, or burning rubber, or anything weird. Take note if it has any unappetizing or strange odours.

IMG_3836 copy

 Day 5ish: 

Around the fifth or so day, you’ll notice the cap not floating quite as much, and the bubbles have begun to slow in frequency. At this stage it is time to strain off the solids. There are a couple of ways that you can do this, but this is the setup I have rigged up. If you are only doing one gallon, just straining it without additional equipment is reasonably easy. If you have a full 3-5 gallon batch going, a fruit press or something more suited to 20 or so pounds of fruit may be necessary.

What I do is use a funnel (it’s actually the hopper from my food strainer) covered in a dampened layer of muslin, and strain the wine into a half gallon jar. This funnel happens to fit perfectly into the mouth of the half gallon jar.

Clean and sanitize the funnel, 2 half gallon jars and a one gallon glass jug (this is where your wine is going next). Dampen a section of muslin or cheesecloth and drape it into the funnel. Carefully dump the wine from your primary fermenter into the funnel. It won’t all fit at once of course so let it strain and add some more.

IMG_3639 copy

Once one jar it full you will want to transfer the funnel carefully to the other jar. When almost all the liquid is drained through, you can squeeze more out of the fruit if you want. Since I use a cloth that lets very little solids through, I give it a really good squeeze at this point. The cloth I use isn’t linked to here since it’s from a craft store and I was having a difficult time finding exactly what I wanted to show on amazon. Anyway, if you are using a coarser (bigger holes) mesh you probably won’t need or want to squeeze it a ton or you’ll have solids coming through. Now, if you don’t have a funnel set up, you can probably get away with straining it with your kitchen strainer and a layer of cheesecloth, again if you are doing a small batch. A jelly bag would work well too.

IMG_3644 copy

Now you have your wine strained. It’s time to transfer it into the gallon jug where you will finish the fermentation and age the wine. Make sure the jug is cleaned and sanitized. What I do at this point is actually just pour it carefully into the jug using a smaller funnel. This is not necessarily the best way to do it, but I’ll explain why I do it this way. If you just strained the fruit through a much coarser funnel or press, you will have larger particles that need to settle out. These are called the “gross lees.” If you use a coarse strainer, strain all the wine into one container, and allow the gross lees to settle out. I don’t really have any issue with this because I strain it through super fine cloth. However, if you have gross lees, or chunky bits, in your wine, let them settle, then rack the wine into the gallon jug instead of pouring it. You also mix in less oxygen this way, but I figure we’ve already mixed it in when straining it so it’s probably no biggie. Also, in this next waiting stage, any sediment is going to settle out, so if you get a bit it’s OK. Once your wine is in the gallon jug, top it off with a bit of water if you don’t have quite enough. You shouldn’t need to though if you had 1.25 gallons or squeezed the fruit well. Add another campden tablet to the wine. Place the airlock into the jug. You want only a tiny bit of space between the airlock cork and the wine to avoid oxidation of your wine. I would at this point recommend vodka or something in your airlock since at least with my iodine sanitizer, once the iodine evaporates you can get mould growth in your airlock. Mould = BAD. Awesome, now you are done for  a while! Place your jug somewhere cool, out of the sun, where it won’t be disturbed.

IMG_4461 copy

Day 5ish until ???

After the transfer day, wine making is just a waiting game. You will continue to have some fermentation for a while, but eventually the bubbling will slow and cease altogether. Admire your wine and patiently wait. Good wine does not happen over night. At this point, it’s up to you when you want to bottle the wine. At the very minimum, you want to wait until the wine is clear and all the sediment has settled to the bottom. You also don’t want any more fermentation occurring, so if there is any activity in the wine, do not bottle it. You will have to wait at least a couple of months. Joel’s instructions suggest between one and nine months. Yes, that’s a huge range. One is probably not going to be enough in many cases for it to be crystal clear, and in nine it’s probably drinkable (aged enough to be tasty and ready). I think 3 or 4 is probably plenty. Remember, as long as it’s clear, and done fermenting you can bottle it because it will still age and mature in the bottle. But wine that is bottled without good clarity isn’t going to clear anymore in the bottle.

From left to right, peach, blueberry, and raspberry wine during the aging process.

IMG_4673

Day 100 ish

Wow, has it really been 95 days? Time flew by! It is time to bottle our wine. We haven’t seen a bubble in 2 months and the wine is crystal clear! Today what you will need is 5 regular sized wine bottles (750 ml). I don’t buy these because I think that would be insane when I already drink wine. Just save your bottles and rinse them out. You will also need 5 corks (number 8 or 9), a corker (they make two main kinds of basic ones – this round compression one, these double level ones and these floor ones), a racking cane with tubing or mini auto siphon and preferably a bottle filler.

Sanitize all your equipment and your bottles and let them air dry. Very gently rack your wine into each bottle. Don’t disturb any of the sediment on the bottom of the jug. Fill your bottle up enough that you will only have a very small amount of space between the wine and the cork. I like to actually hold a cork up to the side of the bottle and see where it will sit so I can adjust the level of the wine. Once you fill all five bottles, cork them up and you are done! Store the wine in a cool dark place and enjoy your wine whenever you desire.

IMG_4470

If you are going to gift them, it’s super fun to make adorable labels for them (shipping labels actually work great – you can design any decorative label you want using the template in word) and add the fancy shrink wrap to the tops

IMG_2510

Unfortunately, a gallon of wine just barely fills five bottles, so you don’t have much left over, but be sure to sample the wee bit that remains, even if it is the sediment filled stuff at the bottom of the jug. Happy brewing!

IMG_4475 copy

*this post contains affiliate links, please see the “About the Blogger” page for more information

Blueberry Lime Jam

I do love blueberries on their own, but sometimes you just need a little something extra to really bring out the flavour of a berry. If you are looking for a jam that really kicks it up a notch, you’ve come to the right place. Adding the juice and zest of a lime or two really enhances the flavour of the blueberries and makes a delicious jam. This recipe is from the Ball Complete Book of Home Preserving. The only change that I make is to use a lower sugar pectin and less sugar, and two limes rather than one, but here it’s written as in Ball.

IMG_3775 copy

Ingredients:
4.5 cups crushed blueberries
5 cups sugar
Zest and juice of 1-2 large limes
1 package of regular pectin (or use low sugar pectin and adjust sugar accordingly)

Here’s what we did:

Prepare the canner, jars and lids. This yields around 6 half pints unless you reduce the sugar.

In a stainless steel pot, combine the crushed berries, lime juice, lime zest, and pectin. Mix well to combine all the ingredients.

IMG_3778 copy

Bring the jam to a full rolling boil over high heat, stirring constantly.

Add the sugar all at once when the boil is reached, and return to a boil. Boil hard for 1 minute, then remove from heat and skim off any foam.

Fill the hot jars leaving a 1/4 inch head space. Wipe rims, apply lids, and tighten the bands finger tip tight.

IMG_3788 copy

Process the jars in a boiling water bath canner, covered by at least 1-2 inches of water for 10 minutes, starting the time when the water reaches a full rolling boil. After the 10 minutes, turn off the heat, remove the canner lid, wait 5 minutes and remove the jars to a hot pad or towel. Cool the jars 12-24 hours, remove bands, check seals, wipe clean, label and store.

IMG_3826 copy

*this post contains affiliate links, please see the “About the Blogger” page for more information

Master Food Preserver Class – Week 7

Week 7 of the Master Food Preserver class was a big old meat fest. We made jerky, smoked fish, pickled fish, and cooked up some summer sausage. This post will be the last in the Master Food Preserver series (I know, so sad), as week 8 was just our presentations and planning for the epic events of this summer. But don’t worry, there is still much more knowledge in that massive notebook of mine that I will continue to share with you all.

The first thing we did in class was make beef jerky. Beef jerky can be made safely at home, but there are just a couple of precautions that you need to take to ensure it is safe. The PNW 632  publication (click it for the link) is full of excellent information for making jerky, but I’ll give you the summary version here.

IMG_3664 copy

Bacterial contamination is a concern when making jerky, which is why it needs to be sufficiently heated to ensure any pathogens are destroyed. Three methods can be used to do this: post-drying heating, precooking the meat, and a vinegar soak. The post drying heating is perhaps the easiest, all you do is cook the jerky in the oven at 275F for 10 minutes after it is done. This is the method I tend to use. Preheating is done either by cooking the jerky strips in hot brine for about 1.5-2 minutes, which obviously doesn’t really work for ground meat jerky, or by cooking in the oven at 325F until an internal temperature of 160F (165F for poultry) is reached. You need a nice thin tipped thermometer for this. Lastly, soaking the meat in vinegar has been shown to be effective as well, but of course gives the jerky a very vinegary flavour. It’s also not been tested for game meats. And that’s basically all there is to it for safety. Jerky can be dried at the highest setting in a dehydrator (145-155F) or in an oven. But for the oven you really need to test if it can maintain those temperatures first.

Other notes about jerky:
– Yes, you can use other meats like poultry, fish and game meats.
– Just recently the recommendations have changed and it is okay to use ground meat, so long as you post dry heat it. Get the leanest meat possible, 93% lean or greater. The concern with ground meat is that the bacteria that could have been on the surface is distributed throughout by grinding, so use extra caution when making ground meat jerky.
A jerky gun can be useful for shaping ground meat into strips.
– To easily cut jerky from steaks, partially freeze it so you can cut even strips; aim for about  1/8-1/4 inch thick.
– To test for doneness, cool the jerky slightly and try bending it. If it bends and cracks it is done. You don’t want it to snap right in half or it’s over done but if it is bendy but still doesn’t really break it’s not done. Ya, it sounds a bit wishy washy, but you get the feel for it pretty quickly.
– When the jerky is done, condition it in a jar or other container, loosely packed. Conditioning basically just means they sit there for a couple says and equalize in moisture content. Shake it occasionally. If you see moisture collect in your container, they are not dry enough.
– Store jerky in a cool dark place. I like to just store it in a quart jar. It will keep for 2 weeks at room temperature, 3-6 months in the refrigerator, and up to a year in the freezer.
– Nom nom nom

IMG_3570 copy

The next thing we did for meat week was to learn about smoking fish. As with jerky, this can be done safely at home, but there are precautions you should follow to ensure a safe product. Additionally, products need to be refrigerated or frozen when made at home as a precaution, even though you can find commercial products that are safely stored at room temperature. This is due to us not being 100% certain of the salt and moisture content when making it at home. Canning your smoked fish is also an option.

If you want more information beyond what I provide here, the publication for this one is PNW 238 (again click for the link).

In summary:
– Smoked fish must reach an internal temperature of 150F (preferably 160F) and hold at that temperature for 30 minutes. This is important to kill bacteria such as Clostridium botulinum.
– Fish must be salted or brined, and since at home it is difficult to measure salt content, this is why as an added precaution the product must be refrigerated.
– Salt fish in a solution of 1 part table salt to 7 parts water, by volume. Brine for about an hour, although fatty or larger pieces of fish need 2 hours. Less fat = less brine time. Experiment with your fish – it should taste salty, but not unpleasantly so.
– After brining, fish is air dried until a pellicle (shiny, tacky skin) forms. This is usually at least 1 hour. After it forms it is ready to be smoked.
– Fish should be smoked then cooked. Smoke at 90F for up to 2 hours, then increase the temperature until the internal temperature of 150F is reached and maintained. This means the smoker temperature needs to be around 220-225F. If this cannot be achieved in your smoker, heat the fish in the oven after it’s smoked.
– Use hardwood for smoking, soft woods make unpleasant fish.
– If canning your smoked fish, just smoke the fish lightly, for up to 2 hours, then can immediately. Pints will need to be canned for 110 minutes. For full instructions follow the PNW 450 publication.
– Don’t store longer than 2 weeks in the fridge, freeze or can if you want to store it longer.

IMG_3572 copy

I wish this were full and I got to take it alllllllll home with me.

IMG_3573 copy

Mmmm smoked salmon. Makes me want to take a fishing trip to Alaska so badly!

IMG_3582 copy

Honestly, I didn’t even taste the pickled fish because it seemed gross, but I promise I will, so for now I’m just going to provide you that publication, PNW 183, because I can’t really claim any insight here.

The last and meatiest product we made was summer sausage. In contrast with jerky, for summer sausage you want fatty fatty fattiness. It tastes pretty good, but I have to admit that I was a little bit grossed out making it. Honestly I don’t think it’s something I will really try making at home, but it was interesting to learn about. The extension service publication that you can refer to is SP 50-735. My only real original thought on the subject, since this was the one and only time I’ve experienced homemade sausage, is that I preferred the texture when we cooked it in the oven, as opposed to a pressure cooker. Both tasted very similar, but it was the texture that I found I preferred. So, that’s all I really have to say on that…check out those sausages.

IMG_3577 copy

So! If you’re a meat lover, get out there and make some meaty meaty products!


*this post contains affiliate links, please see the “About the Blogger” page for more information

Strawberry Freezer Jam

IMG_3289 copy

Freezer jam is a super quick and easy alternative to making canned jam. I love canning, and think everyone should learn how (do it, do it now!!) but there are also a few advantages to freezer jam. First, you don’t have to cook the berries at all. This means you can keep a little more of the natural consistency and taste of the uncooked berries. It’s also faster, and you don’t need a canner, jar lifter or anything like that. I think it’s a great gateway into canned jams, although I did about a million jars of canned jam before ever trying it. But, if you have a little bit of extra freezer space, all you need is the jars, pectin and the berries to make quick an easy freezer jam.

IMG_3286 copy

Ingredients:
4 cups crushed fruit
1.5 cups sugar
1 packet freezer jam pectin

For this endeavor I used Mrs. Wages freezer jam pectin, but Ball and many other brands also make freezer jam pectin.

First, wash, hull and crush the berries.

IMG_3292 copy

Separately, combine the sugar and pectin together and stir to evenly mix them.

IMG_3293 copy

Stir in the crushed berries and then continue to stir the jam for 3 minutes.

IMG_3298 copy

Now all you do is pour it in jars. Leave a half inch or so of head space for the jam to expand when it freezes. Put on the lids and bands. Let it set up at room temperature for a half hour or so prior to freezing it.  You can leave it longer if you want, just not longer than 24 hours. After that just pop it into the fridge or freezer. It will keep around 3 weeks in the refrigerator or a year in the freezer.

IMG_3301

Easy peasy lemon squeezy. Now you really have no excuse to buy store bought jam anymore. This takes under a half hour and yields about 5 jars.

IMG_3304 copy

Roasted Red Pepper and Tomato Sauce

I’ve been wanting to do some different tomato sauce recipes and found this one in one of my newer canning books – “Preserving” by Pat Crocker. This recipe takes a little bit of work with all the roasting, but it is so freaking delicious that it’s totally worth the effort. Now because this is from one of my canning books that I don’t trust with my life necessarily (such as Ball, or an extension service publication), please see my little discussion at the end of this post about how I decided that it is safe for hot water bath canning (but don’t worry, I am posting it because I decided it is).

20131003-152208.jpg

Ingredients:
4 pounds of tomatoes, preferably roma
2 pounds red bell peppers
2 cups chopped onions
1/2 cup red wine vinegar
(or 2/3 if you want to be extra safe – see my rant at the end)
4 tbsp olive oil, divided
10 cloves garlic
1/2 cup packed brown sugar
1/4 cup red wine
1 tbsp salt
1 cup chopped fresh parsley
1/2 cup chopped fresh basil
1 tbsp chopped fresh oregano
1 tbsp chopped fresh rosemary
5 tbsp bottled lemon juice

Here is what I did:

Preheat the oven to 400F

Since I tripled the recipe and I don’t have that many rimmed baking sheets, I needed to roast in phases. I did the tomatoes first. Cut them in half and seed them and place them face down on a rimmed baking sheet. Drizzle 2 tbsp of the oil over them. Roast them for 15-20 minutes.

20131003-151017.jpg

Look at those beauties! Let them cool enough to handle them, peel off the skins and put the tomatoes in your pot. You can chop them coarsely if you like but mine fell apart so easily I really didn’t need to do any chopping.

20131003-151055.jpg

Next roast the red peppers. Place them skin side up, halved and seeded on the baking sheet and drizzle with the other 2 tbsp of oil. Roast the garlic along with them. The peppers take a little longer, maybe 25-30 minutes. Roast until the skins char a little bit. The house will smell sooooo good. Remove the garlic as soon as it is soft, it won’t need that much time, 5 or 10 minutes.

Of course if you are doing the recipe as written and have enough trays, you may be able to do all the roasting at once.

20131003-151201.jpg

Peel the skins off the peppers once they cool enough to handle. Some slide right off but some are a terrible pain. My advice would be to try and grab it by a blister and pull off as much in one go as possible. Chop the peppers and add to the pot with the tomatoes. You can also pour some of the juices released from the tomatoes and peppers on the tray into the pot.

20131003-151224.jpg

Chop the garlic and onions and add them in as well. Bring the sauce to a boil.

20131003-151334.jpg

Add the vinegar, salt, sugar, and red wine and boil for 30 minutes.

20131003-151356.jpg

Add the herbs and continue to boil for an hour or so, until the sauce is thick.

20131003-151419.jpg

Meanwhile prepare the canner, jars and lids. The recipe says it will yield 5 pints, but tripling it it I only made just over 10. This is another reason I thought a little more acid per jar may not be a bad idea.

When the sauce is thickened to your satisfaction, it’s jar filling time! Add 1 tbsp of lemon juice to each jar before filling with the hot sauce.

20131003-151441.jpg

Fill the jars leaving a half inch head space. Wipe the rims, apply the lids, and tighten bands finger tip tight. Place jars in canner, covered by at least 1-2 inches of water. Process at a full rolling boil for 35 minutes.

20131003-151522.jpg

After the 35 minutes is up, turn off the heat, remove canner lid and wait 5 minutes before removing the jars to a hot pad or towel. Wait 12-24 hours for them to cool. Check seals, wipe down the jars, label and store.

20131006-130755.jpg

OK so as promised, here is my safety rant… I mean discussion… about this sauce. As you may notice, there are a LOT of low acid ingredients in this recipe. There is a 2:1 ratio of tomatoes to peppers, and onions on top of that. So, since I really want to be safe in my canning and not make anyone sick, I wanted to check into whether this is acidic enough. My one big reminder here is this: anyone can publish a book/blog/whatever about canning, so always do your research before making a new recipe. Ball for example can be trusted, and so can other books that have actual tested recipes, such as this one, by a university extension service or the USDA. I was a bit wary as to whether this recipe is acidic enough for hot water bath canning, so I referred to some ball ratios to help me decide. I found a salsa recipe that has very similar ratios of tomatoes, peppers and onions. Per tomato amount it has slightly less peppers than this recipe and slightly more onion. When scaled to the quantity of this sauce, it has about 2-3 tablespoons more acid than this recipe, and around a cup more low acid ingredients (onion and pepper). So basically what I am saying here is the recipe seems to be pretty darn close to a trusted recipe I have. And really, all I am saying is stay safe! Definitely do not add more onions or peppers to this recipe! And if you are worried at all, as I was, add a little more acid. I tried a little more lemon juice and think you may start to taste that, but I think upping the vinegar to 2/3 cup would not change the flavour too much, or you could also reduce the peppers or onions a little. All in all I just wanted to remind people not to trust every recipe you see unless they are tested recipes and feel free to be extra safe with a little added acid. OK rant done, now go make some sauce it’s so delicious!

*This post contains affiliate links. Check out the “About the Blogger” page for more information.